Microsoft Lync ushers in a new connected user experience transforming every communication into an interaction that is more collaborative, engaging, and accessible from anywhere. For IT, the benefits are equally powerful, with a highly secure and reliable system that works with existing tools and systems for easier management, lower cost of ownership, smoother deployment and migration, and greater choice and flexibility.
You can download Microsoft Lync Server 2010 Evaluation setup from below link.
http://technet.microsoft.com/en-us/evalcenter/ff808407.aspx
In this article we will discuss how to install and configure Microsoft Lync Server 2010. Below diagram shows the Lync lab setup which we are going to deploy.
Go to Microsoft Lync Server 2010 Enterprise Pool Step by Step Guide

I am using Hyper-V manager to configure all server setup.
| Description | FQDN | IP Address |
| Domain Controller | dc01.doitfixit.com | 192.168.7.101 |
| Microsoft Lync Front End Server 2010 | lync01.doitfixit.com | 192.168.7.103 |
.jpg) Visit http://technet.microsoft.com/en-us/library/gg398438.aspx for recommended hardware requirement and specifications.
Visit http://technet.microsoft.com/en-us/library/gg398438.aspx for recommended hardware requirement and specifications.
Prerequisites
– Microsoft .NET Framework 3.5 with SP1 (To be installed using Server Manager)
– Microsoft Visual C+ 2008 Redistributable
– Windows Media Format Runtime
– Windows PowerShell version 2.0
– Windows Installer version 4.5
Lync Server 2010 can automatically install everything except .NET Framework 3.5 with SP1, Windows PowerShell version 2.0, and Windows Installer version 4.5.
.jpg)
.jpg)
.jpg)
.jpg)
.jpg)
Additional Software Requirements – http://technet.microsoft.com/en-us/library/gg398686.aspx
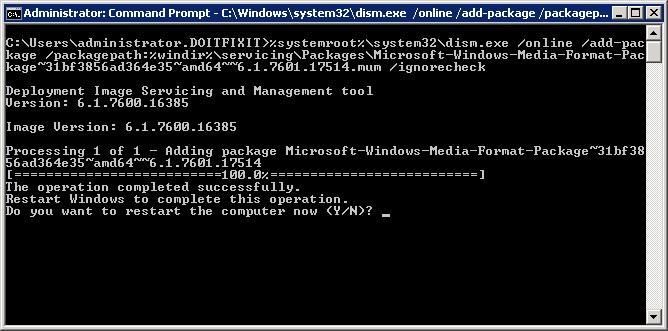
Install the Windows Media Format Runtime on servers running Windows Server 2008 R2.
| %systemroot%\system32\dism.exe /online /add-package /packagepath:%windir%\servicing\Packages\Microsoft-Windows-Media-Format-Package~31bf3856ad364e35~amd64~~6.1.7601.17514.mum /ignorecheck |
Install the Windows Media Format Runtime on servers running Windows Server 2008.
| %systemroot%\system32\pkgmgr.exe /quiet /ip /m:%windir%\servicing\Packages\Microsoft-Windows-Media-Format-Package~31bf3856ad364e35~amd64~~6.0.6001.18000.mum |
To add IIS features run the below command.
| ServerManagerCmd.exe -Install Web-Server Web-Http-Redirect Web-Scripting-Tools Web-Windows-Auth Web-Client-Auth Web-Asp-Net Web-Log-Libraries Web-Http-Tracing Web-Basic-Auth |
.jpg)
Once this is done we can start the installer from Lync Server 2010 media.
.jpg)
Click Yes to install Microsoft Visual C++ 2008 Redistributable package.
.jpg)
Active Directory Preparation
Click Prepare Active Directory to prepare Active Directory schema, forest and domain for the Lync Server.
.jpg)
Click Run
.jpg)
Click on View Log to view the deployment log for executed command.
.jpg)
.jpg)
Now we can verify the replication of schema.
.jpg)
More Info: http://technet.microsoft.com/en-us/library/ms.lync.tbdep.deploymainverifyschemaprep.aspx
Open ADSIedit.msc. On the Action menu, click Connect to – Select Schema from the “Select a well known Naming Context:”
.jpg)
Search for CN=ms-RTC-SIP-SchemaVersion. If this object exists, and the value of the rangeUpper attribute is 1100 and the value of the rangeLower attribute is 14, then the schema was successfully updated and replicated.
.jpg)
Lets prepare the current Forest. Click Run in Deployment wizard.
.jpg)
.jpg)
.jpg)
.jpg)
Verify Replication of Global Catalog
More Info: http://technet.microsoft.com/en-us/library/ms.lync.tbdep.deploymainverifyforestprep.aspx
.jpg)
Go to Active Directory Users and Computers and check for Universal group CsAdministrators in the right side pane. It it is present, replication of the Forest Preparation has been successful.
.jpg)
Lets prepare the domain.
.jpg)
.jpg)
.jpg)
Verify Replication in the Domain
Open Lync Server Management Shell from start menu and run below command.
Get-CsAdDomain -Domain <domain name> -GlobalSettingsDomainController <FQDN of Domain Controller>
Get-CsAdDomain -Domain doitfixit.com -GlobalSettingsDomainController dc01.doitfixit.com
If the domain is ready you will get “LC_DOMAINSETTINGS_STATE_READY” message.
.jpg)
Add Lync administrator to CSAdministrator group.
.jpg)
Now open the Lync Server Deployment Wizard.
Now we can start the Lync Server First Standard Edition Server Preparation.
Read below Part II and Part III of Lync Server 2010 Deployment Step by Step guide.
Leave a Reply